
I have been fiddling with this since before I went public with this blog to come up with a workable solution that would allow me to have basic progress bars for my WIP's, etc. without having to host a slew of small, pre-made images. I have a paid Photo Bucket account so the actual hosting of images isn't an issue, I just didn't want to deal with images or tables, which I can't seem to use (tables) without messing up. I wanted simple to use with 'minimal' changes needed for size and color. Everyone has their own preferences...images, tables, etc. My preference is this script so here it is! :)
You will not need to mess with your template code. This all goes right in a 'page element'. I am using the new version of blogger and unless someone lets me know otherwise, I do not know if this will work in the older version of blogger.
I found a block of code over at Unlikely Words via web archive, but it wouldn't work 'as is' inthe 'new blogger'.. Through reading up on XHTML, and LOTS of trial & error I finally came up with a working script. As scripted progress bars seem to be a much sought after option, I thought I would share my solution so others who want it can simply copy/paste it into their page element.
Under Template > Page Elements choose add a page element. Select "Add HTML/JavaScript" Type in your title then copy/paste the below into the body.
<script language="javascript" type="text/javascript">
  // drawPercentBar()
  // Written by Matthew Harvey (matt AT unlikelywords DOT com)
  // (http://www.unlikelywords.com/html-morsels/)
  // Modified to XHTML 1.0 Standards by Teresa Daniels (hooks-n-needles.blogspot.com)
  // (http://hooks-n-needles.blogspot.com/)
  // Distributed under the Creative Commons
  // "Attribution-NonCommercial-ShareAlike 2.0" License
  // (http://creativecommons.org/licenses/by-nc-sa/2.0/)
  function drawPercentBar(width, percent, color, background)
  {
    var pixels = width * (percent / 100);
    if (!background) { background = "none"; }

      document.write('<div style="position: relative; line-height: 1em; background-color: none; border: 1px  solid #AB6F6F; width: 200px;">');
      document.write('<div style="height: 1.5em; width: ' + pixels + 'px; background-color: '
                     + color + ';"></div>');
      document.write('<div style="position: absolute; text-align: center; padding-top: .25em; width: '
                     + width + 'px; top: 0; left: 0;">' + percent + '%</div>');
      document.write('</div>');
  }
</script>
Locate this line " border: 1px solid #AB6F6F; width: 200px; " and change the following to suite your template.
- "1px solid #AB6F6F;" This is the border of the actual bar. If you want a thicker border change the 1 to a 2, etc. and change the color hex # to represent your choice of border color. NOTE: These progress bars are transparent so your page background color will show as seen in the sample at the begining of this post.
- Change the "200px" for how wide you want your bars to be. Mine are set at 200px but many I've seen that use images for bars are about half that size. It's all a matter of preference and what size works best with your template.
Now to have a bar actually show up, add the below AFTER the script.
<div class="module-typelist module">
<div class="typelist-plain module-content"><ul class="module-list">
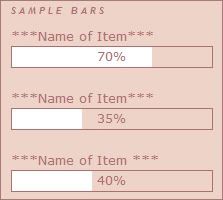
<div class="typelist-note-label"> ***Name of Item*** </div><div class="typelist-note"><script language="javascript" type="text/javascript">drawPercentBar(200, 70, '#ffffff'); </script></div>
<br/>
<div class="typelist-note-label"> ***Name of Item*** </div><div class="typelist-note"><script language="javascript" type="text/javascript">drawPercentBar(200, 35, '#ffffff'); </script></div>
<br/>
<div class="typelist-note-label"> ***Name of Item *** </div><div class="typelist-note"><script language="javascript" type="text/javascript">drawPercentBar(200, 40, '#ffffff'); </script></div>
</ul></div></div></tr></table></div>- You will now type in the name of your item where indicated above (*** Name of Item*** ). Then you will move on to make changes in the section in parentheses ( ).
- The "200" represents the size of bar and/or filling of the bar. I keep my border size & bar size the same.
- The second number represent the percentage and/or how much of the bar will be filled. If you set it to 50 the bar will be half full and 50% will show up centered in the bar. NOTE: The 50% will be in your blogs default font size and color. You blog's default font size determines the height of the bar. If you don't want to use your default font you will need to add font tags to change it.
- The hex# is for the color you want the bar to fill with. In this sample (and the image above) the bars fill with white.
Once you've made your changes save it and you're good to go. If you need more or less bars, add or remove the following for each instance: NOTE: If you don't want a line break between your bars remove the <br/> tag.
<br/> <div class="typelist-note-label"> ***Name of Item*** </div><div class="typelist-note"><script language="javascript" type="text/javascript">drawPercentBar(200, 35, '#ffffff'); </script></div>
I hope I've outlined how to do this so it's easy enough for all to follow. If you use this in your blog I'd love to see your customizations so please leave a comment with your blog URL so I can take a peek. :-) Additionally, please link back to this post if you would like to share this with others who may be interested in using it. But most of all...have fun tweaking it for your blog! :-)


14 comments:
Works perfectly! Thanks so much!
You're welcome ine and thank you! for leaving a comment. I was wondering if I had laid it out ok so that it was easy enough to understand and implement.
I added a link to your blog also. Looks like you are getting off to a great start!
Thanks so much!!! I am completely clueless when it comes to this stuff and a total blog newbie. Thanks to your great instructions I was able to do it!!!
I have been furiously hunting for something like this. You are a goddess! Thank you so much! You've made my month : )
Hello Ms. V! Your goddess comment had me cracking up! :D Glad to hear you could use this script. I know only to well the frustration of trying to find something that would work and not being able to; which is why I decided to offer what I came up with.
Hopefully others interested in something like this will be able to find it easily enough.
Have a great day!
Hiya Molly! You are quite welcome and thanks for the comment. It's good to know a 'newbie' was able to follow my instructions with ease.
Happy blogging! :)
this is great!
thank you
i am going to try this tonight after i post
(found you vis ravelry and your seraphina shawl - gorgeous!)
This is the most helpful post regarding the progress bars that I've ever encountered. Thanks to you they are up and running on my site!
Thanks so much for this. It worked! The only thing I had to do was format the first section of HTML to match yours. Otherwise the bars didn't show up, only the text. Kind of weird.
Thank you! I really appreciate that you put this out there.
Didn't work for me :(
Who knows where to download XRumer 5.0 Palladium?
Help, please. All recommend this program to effectively advertise on the Internet, this is the best program!
Is there any way to change the color of the text? Otherwise this is great! I searched and searched for a good progress bar and for the longest time I just had to upload an image that I created myself.
What makes your progress bar so great is your instructions. I've found great progress bars before, but I couldn't understand the instructions-- the coding is just beyond me. But you laid it out and made it very simple. Thanks.
Interesting. I got these to post perfectly in my sidebar, but now that I'm trying to post them in an actual post all that shows up is the title of the bar. I've tried changing color and size, but nothing makes a difference.
Post a Comment