Friday, August 10, 2007

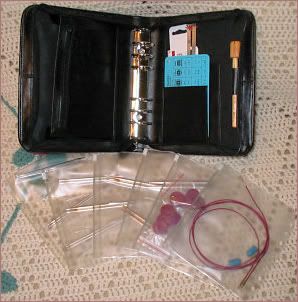
    Exceptional options needles arrived


I am beyond pleased with KnitPicks Options interchangeable needle set! Not only did it take less than a week for them to get here (came in yesterday's mail), the needles and cords are far more superior then I anticipated. The needles are very smooth and light-weight with nice pointy tips. The cords are extremely flexible with a very smooth join that easily tightens down with the included key.

I went through and checked every needle and cord by screwing them together to be sure there were no flaws. The set as a whole is absolutely perfect. Although I was going to wait until today to actually try knitting with them, I just couldn't do it! While sitting in the dark last night watching TV I cast on to do a swatch just to see how the needles felt. I am in awe! As a new knitter I have trouble keeping my knit and pearl stitches uniform. Not so with Knit Picks Options! Not only were my stitches perfectly uniform my speed had at a minimum, doubled. Even more amazing, I was able to sit there and knit in the dark with no difficulty. Normally I have to watch every movement of my needles and I didn't have to with these.

I won't give up my Denise needles as I still feel they are better suited to certain fibers and added to that, I'll likely have less difficulty getting through airport security with them. But, needless to say, I can't wait to get more of the options needles & cords until I have the complete line. Oh Chris!? ;):D

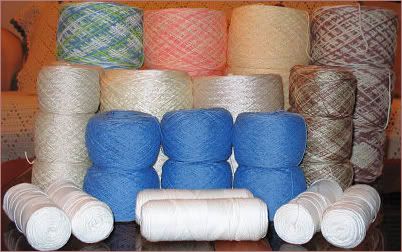
     Latest yarn stash


I haven't done any crocheting in the last few days because I've been busy with other things. I've been laid up since July 2nd. with 2 herniated discs and am finally starting to feel much better. I'm still quite sore but I'm standing straighter and as long as I remember to walk with more of a shuffle than taking actual steps I get around pretty good. So, I've been trying to catch up on things around the house by chasing dust bunnies and taking care of the so-called piles I've accumulated within arms reach of where I've spent the last month sitting or laying down. While it's been nice having things close enough (crocheting, knitting, books, etc.) so that I wouldn't go out of my mind with boredom or cause myself excruciating pain trying to find something to do, I'm tired of looking at the clutter and so is Chris! I'd say that's a good sign that I am in fact feeling better! lol

One of the things I did yesterday was get out my ball winder so I could take care of my most recent shipment of yarn/thread. I wind pretty much everything, including crochet thread. This enables me to address any flaws in the yarn/thread (breaks, knots, defects, etc.) before I'm halfway into a project. I find cones difficult to work from because you have to have them positioned 'just right' so the yarn feeds freely and thread with the cardboard cores are not only cumbersome, but awkward in that the thread does not feed freely unless you have a ball holder of some sort. I have no desire to carry a huge cone of yarn or a ball of thread still on the cardboard when I'm on the go. By winding everything I'm able to slip a ball of yarn or thread into an appropriate sized zip bag, drop it in my purse or tote bag and I'm good to go. My supplies stay clean and neat and I can easily work from my purse or bag by just opening the bag a crack.

Added to my stash and now ready to be placed in storage bags: Peaches & Cream worsted, 1lb. each, color desert sand and sea mist. Peaches & Cream 3 ply baby weight, 1lb. each, color peaches 'n cream and moon silk. Rayon Super Petalspun worsted, 1lb., color ivory. Rayon Petalspun sport, 1lb., color ecru. AB size 3 perle cotton, 6 balls 230 yards each in ecru & earthtone. AB size 10 crochet thread, 6 balls 350 years each in denim. AB size 10 crochet thread, 6 skeins 400 yards each in white.

I do have certain projects for all of the above and the white thread I will dye to a specific shade I have in mind. Of course I want to just dive right in and get started with my new yarn but I'm trying real hard to hold myself back and finish stuff I already have on my hook or needles. It's so hard though to keep myself from starting just one more thing...I want to play with the new stuff...yanno? lol


As a final note, I am SO glad that several months ago I ordered color cards with yarn samples...something I wish I had done a very long time ago. Having the cards took the guess work out of finding exactly what I wanted as far as color, texture, ply, and all those other things that go in to selecting fiber for a project. Now I don't have to worry about the accuracy of colors I see on various websites that sell yarn...all I have to do is look at my samples and I can not only see the colors, but touch the fiber and also easily pick out coordinating colors with 100% accuracy. Life is good... :)

Tuesday, August 7, 2007

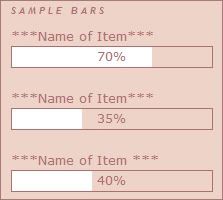
    Easy progress bars for new blogger. No images required! :-)


I have been fiddling with this since before I went public with this blog to come up with a workable solution that would allow me to have basic progress bars for my WIP's, etc. without having to host a slew of small, pre-made images. I have a paid Photo Bucket account so the actual hosting of images isn't an issue, I just didn't want to deal with images or tables, which I can't seem to use (tables) without messing up. I wanted simple to use with 'minimal' changes needed for size and color. Everyone has their own preferences...images, tables, etc. My preference is this script so here it is! :)

You will not need to mess with your template code. This all goes right in a 'page element'. I am using the new version of blogger and unless someone lets me know otherwise, I do not know if this will work in the older version of blogger.

I found a block of code over at Unlikely Words via web archive, but it wouldn't work 'as is' inthe 'new blogger'.. Through reading up on XHTML, and LOTS of trial & error I finally came up with a working script. As scripted progress bars seem to be a much sought after option, I thought I would share my solution so others who want it can simply copy/paste it into their page element.

Under Template > Page Elements choose add a page element. Select "Add HTML/JavaScript" Type in your title then copy/paste the below into the body.


<script language="javascript" type="text/javascript">
// drawPercentBar()
// Written by Matthew Harvey (matt AT unlikelywords DOT com)
// (http://www.unlikelywords.com/html-morsels/)
// Modified to XHTML 1.0 Standards by Teresa Daniels (hooks-n-needles.blogspot.com)
// (http://hooks-n-needles.blogspot.com/)
// Distributed under the Creative Commons
// "Attribution-NonCommercial-ShareAlike 2.0" License
// (http://creativecommons.org/licenses/by-nc-sa/2.0/)
function drawPercentBar(width, percent, color, background)
{
var pixels = width * (percent / 100);
if (!background) { background = "none"; }

document.write('<div style="position: relative; line-height: 1em; background-color: none; border: 1px solid #AB6F6F; width: 200px;">');
document.write('<div style="height: 1.5em; width: ' + pixels + 'px; background-color: '
+ color + ';"></div>');
document.write('<div style="position: absolute; text-align: center; padding-top: .25em; width: '
+ width + 'px; top: 0; left: 0;">' + percent + '%</div>');
document.write('</div>');
}
</script>


Locate this line " border: 1px solid #AB6F6F; width: 200px; " and change the following to suite your template.

- "1px solid #AB6F6F;" This is the border of the actual bar. If you want a thicker border change the 1 to a 2, etc. and change the color hex # to represent your choice of border color. NOTE: These progress bars are transparent so your page background color will show as seen in the sample at the begining of this post.

- Change the "200px" for how wide you want your bars to be. Mine are set at 200px but many I've seen that use images for bars are about half that size. It's all a matter of preference and what size works best with your template.

Now to have a bar actually show up, add the below AFTER the script.


<div class="module-typelist module">

<div class="typelist-plain module-content"><ul class="module-list">


<div class="typelist-note-label"> ***Name of Item*** </div><div class="typelist-note"><script language="javascript" type="text/javascript">drawPercentBar(200, 70, '#ffffff'); </script></div>


<br/>

<div class="typelist-note-label"> ***Name of Item*** </div><div class="typelist-note"><script language="javascript" type="text/javascript">drawPercentBar(200, 35, '#ffffff'); </script></div>


<br/>


<div class="typelist-note-label"> ***Name of Item *** </div><div class="typelist-note"><script language="javascript" type="text/javascript">drawPercentBar(200, 40, '#ffffff'); </script></div>


</ul></div></div></tr></table></div>


- You will now type in the name of your item where indicated above (*** Name of Item*** ). Then you will move on to make changes in the section in parentheses ( ).

- The "200" represents the size of bar and/or filling of the bar. I keep my border size & bar size the same.

- The second number represent the percentage and/or how much of the bar will be filled. If you set it to 50 the bar will be half full and 50% will show up centered in the bar. NOTE: The 50% will be in your blogs default font size and color. You blog's default font size determines the height of the bar. If you don't want to use your default font you will need to add font tags to change it.

- The hex# is for the color you want the bar to fill with. In this sample (and the image above) the bars fill with white.

Once you've made your changes save it and you're good to go. If you need more or less bars, add or remove the following for each instance: NOTE: If you don't want a line break between your bars remove the <br/> tag.

<br/> <div class="typelist-note-label"> ***Name of Item*** </div><div class="typelist-note"><script language="javascript" type="text/javascript">drawPercentBar(200, 35, '#ffffff'); </script></div>


I hope I've outlined how to do this so it's easy enough for all to follow. If you use this in your blog I'd love to see your customizations so please leave a comment with your blog URL so I can take a peek. :-) Additionally, please link back to this post if you would like to share this with others who may be interested in using it. But most of all...have fun tweaking it for your blog! :-)
Friday, August 3, 2007

    Options Needle Set


WooHoo! Yippee! Yeehaaawww! I just ordered my very own set of Knit Picks Options Needles! I'm so excited! I can't wait until they arrive! I have had the entire line of needles on my 'wish list' for quite some time but really didn't expect to get them until maybe Christmas time or later. But...

Every few weeks or so Chris out of the blue just give me some money so I can get more yarn. He is so wonderful and supportive of my fiber addiction even though he says we need to move to a bigger place to have room for it all! lol Last week I received via UPS 12 pounds of yarn & thread so I never expected, not in the least, that today he would say "Why don't you go ahead and order those needles?" If it wasn't for the fact that I've been laid up with 2 herniated discs I would have done hand-springs! :-D

Needless to say, I ordered the set right away and added the WPI tool and knit card on as a bonus. I'll get the remaining needles some time down the road to complete the set but until then, I should have plenty to keep me occupied. I feel like a little kid waiting for Santa to come and bring me goodies. lol I love my pink Denise needles but have found they are not suited (for me anyway) to all types of yarn. That being said, I can't use 10" or 14" needles at all....give me circs or interchangeables any day. Granted I haven't been knitting for that long, but I wasn't able to teach myself to knit until I actually got the Denise needles. I know I will continue to use them but I am so looking forward to the click, click, click of the Knit Picks options set.

Wednesday, August 1, 2007

    Library Thing

I recently started cataloging all my craft related books, magazines and what not over at Library Thing (thumbnail preview in sidebar) and while time consuming and no where near done yet, boy has it made things easier for me already! A quick glance at the thumbnail images (some I had to scan in myself) I can see exactly what I have or don't have. Now when I see a book I'm interested in on eBay, Amazon, etc. instead of jumping up to go rummage through my bookcases(s) I can simply open another tab and glance through my library.

To make a long story short: The past 5 years have been difficult in that when I moved to Florida everything I had in storage to be retrieved when I found a place to live mysteriously disapeared...some showing up in used goods stores back home....gee...wonder how that happened? *sigh* Needless to say I have had to start over and often find myself scratching my head because I'm sure I have something only to find out it was something I 'used' to have. A lifetime of stashing, collecting and treasuring things that were passed down in my family, gone! Just like that. I honestly believe it would have been easier for me to deal with emotionally had it happened as a result of a fire or natural disaster. At least then most of what I had would have been covered by insurance but no, my loss was due to the selfish, greedy cruelty of others.

Needless to say, library thing has been a very handy reference for me. Once I'm done cataloging & adding my tags I'll start checking out some of the other users library's. Some users have books for trade/sale..maybe I'll be able to hunt up some of the ones I used to have? It won't be quite the same because it wouldn't be the exact book given to me by my grandmother or mother but I would treasure them just the same. :-)

    Ravelry Beta


If you are a crocheter, knitter, etc. and not yet familiar with ravelry I encourage you to head on over for a Sneak Peek so you can see what it's all about. Below quote from: ravelry.com 'About Us'.

Ravelry is a place for knitters, crocheters, designers, spinners, and dyers to keep track of their yarn, tools and pattern information, and look to others for ideas and inspiration.

The content here is all user-driven; we as a
community make the site what it is. The Yarn Harlot wrote recently about Representing, showing the world the power of our community, and I believe that on this site we can really show the strength of our numbers and the depth of our
creativity.

So what can you personally do on Ravelry? You can talk about your own projects, integrate that information into your personal website and contribute to someone else's project a world away.

If you are not a blogger, we give you a great way to share and show off your projects, participate in -alongs, and socialize with other crafters. If you are a blogger than Ravelry is the perfect complement to your online journal; it provides structure and organization. All of your information is easy to enter and easy to find. You will not need to update your own FO album again- it is all here on Ravelry!


The brain child of Jess & Casey, Ravelry is currently in beta stage but so phenomenal already I don't know how it can get any better! There is something there for everyone. I have been working on cataloging all of my crochet & knitting goodies...NOT a small undertaking, but it's been fun! And, I feel great about having it all organized in one place for easy printing so I can just stick it in my purse and know what I have or don't have when I'm out and about and just 'happen' to run in to Joann's, Michaels, Hobby Lobby, AC Moore's, etc. :D

There is so much I am interested in at Ravelry and I do plan to get more involved but will wait a bit so I don't 'over-indulge' and spread myself to thin. That and I need a new camera...mine has decided that the only type of pictures it will take are of solid rectangular black boxes. :(

Hope to see you around on Ravelry!